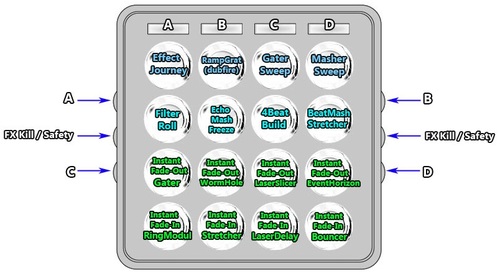
One-Button-Mashup_V2
Description and Instructions
This is improved version of the V1 mapping which combines all the most interesting One-Button mapping entries from DJ TechTools mapping contest.
There was a plenty of strong ideas so we decided to go ahead and compile one Master Mapping for all of Midi Fighter 3D fans!
Main Features:
- 4Deck mapping: press any top bank buttons or side corners to select deck + route effects to that deck.
- 16 INSTANT Gratification effect style buttons.
- Motion FX controls to further modulate each button mapping.
- Safety/Reset button.
- Full LED feedback. Each button LED is mapped to display current button state depending on the parameter modulations, modifier states, or what ever else is going on in the Traktor.
Description and Use:
Each row is mapped for a different style of effect presets - one press build ups, incremental button tricks or fade IN/OUT transition effects. Instant mixer mappings were geniously good but also avery complex to be used in a real set so we took them a part and mapped some of coolest transitions to the individual buttons on the MF3D.
1st button row:
- FX Journey
- Ramp Grat (Dubfire effect)
- Gater Sweep
- Masher Sweep
- Gater
- WormHole
- LaserSlicer
- EventHorizon
- Ring Modulator Riser
- Transpose Stretch Riser
- Laser Delay
- Bouncer
Note: Each button mapping has it's own set of pre-mapped effect macros in the motion control. Be sure to check it out!
Easy 3-Step Setup Instructions:
1). Open the MF Utility software and import the .MFS file then click "Send To Midifighter" to install new midifighter settings needed to run this mapping.
2). Click on the BIG Import button in the bottom of Traktor Preferences window and then navigate to the folder where the mapping file was saved. Once you select a .tsi file and click OK the next window will pop-up asking you which settings do you wish to import. Only "controller mappings" and "effect settings' categories will be selected - then click OK. Please note that you need to repeat this step one more time to successfully import the FX settings.
3). Once the mapping is installed there will be four different mapping devices in the menu. Make sure that In-Port and Out-Port are set to your MF3D for each part of the mapping and start jamming!
THAT IS ALL GUYS! IF YOU REALLY LIKE THIS MF3D MAPPING GO SUPPORT DJ TECHTOOLS!
Stewe, Nov, 2014

Fred225 over 8 years ago
Fred225 over 8 years ago
Thank you for your answer. How could I map the button I wish to use instead of the default commands please? (Because it was made for MF3D and the midi messages are not the same). For example, do I have to replace all the commands mapped to the same button in the original mapping to the one i want? (highlighted in yellow meaning that it is triggered by the same button). Thank you.
Ricardo Bono II over 9 years ago
phil reed about 10 years ago
Stewe about 10 years ago
Use the bottom row buttons on your cued up track - not with the one that's already playing.
Johan almost 11 years ago
Stewe almost 11 years ago
This mapping is not supported by Spectra at this time. In theory, you could set arcade buttons to correct midi channel and have them properly linked to the mapping but the side buttons should need some more re-mapping work.
Matthieu Inglese about 11 years ago
Stewe almost 11 years ago
Hey, This mappings are based on the "Deck Focus" feature. You should ensure not to change the deck target with a mouse or by using some other controller/mapping before using the fade-out buttons. I think that could be the case here.

Stewe over 8 years ago
Hi, this mapping will work with any MIDI controller. Just be sure to import your Midifighter mapping by using big import button - than add your SX2 mapping by using smaller "ADD" button which is located in the Device section of the screen.