Twister 4FX Pro
Description and Instructions
Feature content:
- Full control over all four FX Unit parameters.
- Route effect to all four decks.
- Toggle Single/Group FX Unit mode.
- Select effects for each FX slot.
- Load custom FX presets.
Rotary Knobs:
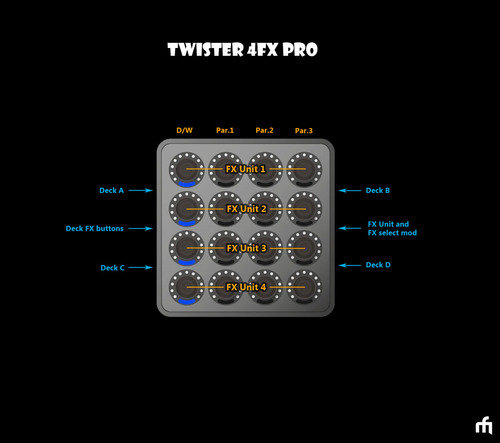
Each horizontal row of the rotary encoders represents one FX Unit in Traktor. The first rotary in each row is controlling your Dry/Wet signal - this encoder ring is set to display a full Bar. Other three rotaries are control over the effect parameters - to create a visual difference from the D/W knob this other three encoders are set as a Dot indicators.
Note: The LED RING indicators can easily be changed in the MF Utility program.
FX Routing Model:
There are two ways of "arming" a deck with effects. Use right and left handed corner side buttons to instantly toggle all four FX units to the deck of choice - while held down, any of this buttons will display assigned deck in the RGB LED under the knobs. Press and hold the left handed middle side button to bring up the Deck FX menu if you wish to manually assign this buttons.
Additional FX Unit Control Mod:
Press and Hold the right handed middle side button to open the FX Unit manager. This is where you can find FX Unit mode and FX select functions.
- Push down the Dry/Wet knob in each row to switch between Single and Group effect mode
Single effect mode:Twisting any of four dedicated rotaries can manually select the effect in each of the Units. Or, push the same knobs down to choose from one of three presets:
D/W | Filter 92 | Reverb T3 | Delay
Group effect mode:
Twist rotaries 2, 3, 4 to manually select the effects for each three FX slots in a Unit. Push down the same knobs to select an FX chain preset:
Knob 2: Filter92-LFO + DelayT3 + Reverb
Knob 3: Beatmasher + Filter + Reverb
Knob 4: Gater + Filter92-LFO + IceVerb
Knob #3 and #4 chains are meant to help your transitions between songs. Watch this DJTT video tutorial to learn more:
https://www.youtube.com/watch?v=iEYTVyu6WJk
SETUP:
Download and un-zip the file. Inside you should see a .MFS and a .TSI
1). Open the MF Utility software and import the .mfs file (Midi Fighter Settings) then click "Send To Midifighter" to apply new settings to the device. This mapping doesn't use utility to determine the button color for each bank so all the buttons should display BLACK after importing the .mfs file.
2). Run Traktor and click the gear symbol to open the preferences window. Click the BIG IMPORT button in the bottom of the preferences window and navigate to the folder where the mapping file is saved. Once you select the .tsi and click OK the next window will pop-up asking you which settings do you wish to import. The "controller mappings" and the "effect settings' categories will be automatically selected - then click OK. Please note that you need to repeat this step one more time to successfully import the FX settings. (this only matters if you're installing this mapping for the first time)
3). Go into the Controller Manager and make sure that the In-Port and Out-Port for the mapping are set to your MF Twister.
4). The RGB animation screen at start up indicates that the mapping is installed. Push down any of the 16 rotary knobs to close this screen and access the FX control.
That's all folks! I hope you enjoy the mapping.


Stewe over 8 years ago
I'd check if you had imported correct .MFS file.