
Midi Fighter 3D - Freeze Mode Wizard
Description and Instructions
Going from top to the bottom this mapping turns the 4x4 Midifighter arcade button grid in to a 16 button slices.
Mapping Highlights:
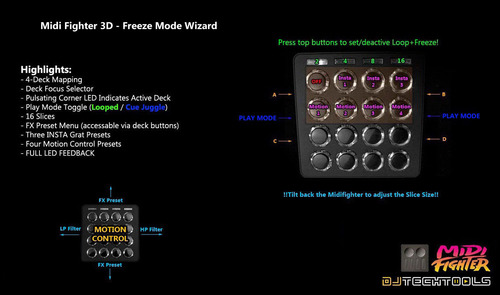
To make a whole freeze track process more straight forward and intuitive this mapping has four dedicated buttons which are mapped for macro control. Pressing any of this four buttons will activate the FREEZE function - pressing the active button again (or centers) will get you out of the freeze mode. Note: While in freeze, press other top buttons to change the loop size without getting out of the freeze mode. Please refer to the image below and look at the top bank buttons.
LOOP Mode:
Button #1: Set Loop+Freeze On+Set Loop Size 2 counts
Button #2: Set Loop+Freeze On+Set Loop Size 4 counts
Button #3: Set Loop+Freeze On+Set Loop Size 8 counts
Button #4: Set Loop+Freeze On+Set Loop Size 16 counts
CUE Mode:
Button #1: Freeze On+Set Loop Size 2 counts
Button #2: Freeze On+Set Loop Size 4 counts
Button #3: Freeze On+Set Loop Size 8 counts
Button #4: Freeze On+Set Loop Size 16 counts
(Cue mode will only set virtual cue points+Flux at this time - I don't have Kontrol S8 to test how the native mapping is set)
Side corner buttons are the deck selectors + effect routing model. To display active deck you can set your Deck Focus in the software or simply look at the top arcade corners - each corner will have permanent pulsating LED indicator for the deck being active.
Side middle buttons are the Play Mode toggles - ether Looped (green buttons) or Virtual Cue Juggle (blue buttons). Each time the center side button is press the FREEZE mode will be automatically disengaged leaving the clear preset for using next play mode.
Pressing the Slices will also engage the Flux Mode feature (hold mode). While slicing, tilt the MIdifighter towards yourself to adjust the Slice Size.
ADD EFFECTS TO THE MIX:
This mapping also has some cool effects presets that you can add on top of the mix ether by pressing button slices or by tilting the Midifighter front-back or sideways. They are designed to make this glitches sound more fun.
To open the FX Preset Menu, press corner side button select one of four Traktor Decks, then press active deck button for the second time and the menu will pop up for the time the button is being held down. While in FX Menu, press buttons 2-8 to select one of the presets or press the button #1 to disengage effects.
TILT FRONT-BACK:
Button #1: PRESETS OFF (clear slices)
Button #2: Instant Button_:Turntable Effect
Button #3: Instant Button_:Multi Effect Mode_RampDelay+Reverb+Gater+Flanger+GranuPhase+DarkMatter+Bouncer
Button #4: Instant Button_:Delay+Reverb+Filter92-O+TapeDelay+IceVerb
Button #5: Instant Motion_:TransposeStretch+Reverb+IceVerb
Button #6: Instant Motion_:WormHole+DigitalLoFi+MulhollandDrive+Filter
Button #7: Instant Motion_:Gater+Reverb+PeakFilter+Filter92-O+IceVerb
Button #8: Instant Motion_:Strrretch(Fast)+Strrretch(Slow)+Delay
TILT SIDEWAYS:
Tilt Left: Low Pass Filter
Tilt Right: High Pass Filter
Important note: Effects will work independently/regardless of the FREEZE MODE being ON or OFF.
REQUIREMENTS:
1) Traktor Pro 2.7.0 or better.
2) Latest version of Midifighter Utility software and newest MF firmware.
3) Midi Fighter 3D. This mapping is not fully compatible with the MF Spectra at this time.
EASY 3-STEP SETUP INSTRUCTIONS:
1). Open the MF Utility software and import the .MFS file then click "Send To Midifighter" to install new midifighter settings that are needed to run this mapping.
2). Click on the BIG Import button in the bottom of Traktor Preferences window and then navigate to the folder where the mapping file was saved. Once you select a .tsi file and click OK the next window will pop-up asking you which settings do you wish to import. Only "controller mappings" and "effect settings' categories will be selected - then click OK. Please note that you need to repeat this step one more time to successfully import the FX settings.
3). Once the mapping is installed there will be four different mapping devices in the menu. Make sure that In-Port and Out-Port are set to your MF3D for each part of the mapping and start jamming!
NOTE:
Mapping Highlights:
- 4-Deck mapping.
- Based on Deck Focus Selector.
- Pulsating corner LED's indicate the ACTIVE Deck.
- Play Mode Toggle (Looping / Cue Juggle)
- 16 Slices. (8 slices is default setting if you use Midifighter 3D with Kontrol D2, Kontrol S5 and Kontrol S8)
- FX Presets Menu.
- Three INSTANT Gratification effect presets.
- Four motion control effect presets.
- FULL LED FEEDBACK!
To make a whole freeze track process more straight forward and intuitive this mapping has four dedicated buttons which are mapped for macro control. Pressing any of this four buttons will activate the FREEZE function - pressing the active button again (or centers) will get you out of the freeze mode. Note: While in freeze, press other top buttons to change the loop size without getting out of the freeze mode. Please refer to the image below and look at the top bank buttons.
LOOP Mode:
Button #1: Set Loop+Freeze On+Set Loop Size 2 counts
Button #2: Set Loop+Freeze On+Set Loop Size 4 counts
Button #3: Set Loop+Freeze On+Set Loop Size 8 counts
Button #4: Set Loop+Freeze On+Set Loop Size 16 counts
CUE Mode:
Button #1: Freeze On+Set Loop Size 2 counts
Button #2: Freeze On+Set Loop Size 4 counts
Button #3: Freeze On+Set Loop Size 8 counts
Button #4: Freeze On+Set Loop Size 16 counts
(Cue mode will only set virtual cue points+Flux at this time - I don't have Kontrol S8 to test how the native mapping is set)
Side corner buttons are the deck selectors + effect routing model. To display active deck you can set your Deck Focus in the software or simply look at the top arcade corners - each corner will have permanent pulsating LED indicator for the deck being active.
Side middle buttons are the Play Mode toggles - ether Looped (green buttons) or Virtual Cue Juggle (blue buttons). Each time the center side button is press the FREEZE mode will be automatically disengaged leaving the clear preset for using next play mode.
Pressing the Slices will also engage the Flux Mode feature (hold mode). While slicing, tilt the MIdifighter towards yourself to adjust the Slice Size.
ADD EFFECTS TO THE MIX:
This mapping also has some cool effects presets that you can add on top of the mix ether by pressing button slices or by tilting the Midifighter front-back or sideways. They are designed to make this glitches sound more fun.
To open the FX Preset Menu, press corner side button select one of four Traktor Decks, then press active deck button for the second time and the menu will pop up for the time the button is being held down. While in FX Menu, press buttons 2-8 to select one of the presets or press the button #1 to disengage effects.
TILT FRONT-BACK:
Button #1: PRESETS OFF (clear slices)
Button #2: Instant Button_:Turntable Effect
Button #3: Instant Button_:Multi Effect Mode_RampDelay+Reverb+Gater+Flanger+GranuPhase+DarkMatter+Bouncer
Button #4: Instant Button_:Delay+Reverb+Filter92-O+TapeDelay+IceVerb
Button #5: Instant Motion_:TransposeStretch+Reverb+IceVerb
Button #6: Instant Motion_:WormHole+DigitalLoFi+MulhollandDrive+Filter
Button #7: Instant Motion_:Gater+Reverb+PeakFilter+Filter92-O+IceVerb
Button #8: Instant Motion_:Strrretch(Fast)+Strrretch(Slow)+Delay
TILT SIDEWAYS:
Tilt Left: Low Pass Filter
Tilt Right: High Pass Filter
Important note: Effects will work independently/regardless of the FREEZE MODE being ON or OFF.
REQUIREMENTS:
1) Traktor Pro 2.7.0 or better.
2) Latest version of Midifighter Utility software and newest MF firmware.
3) Midi Fighter 3D. This mapping is not fully compatible with the MF Spectra at this time.
EASY 3-STEP SETUP INSTRUCTIONS:
1). Open the MF Utility software and import the .MFS file then click "Send To Midifighter" to install new midifighter settings that are needed to run this mapping.
2). Click on the BIG Import button in the bottom of Traktor Preferences window and then navigate to the folder where the mapping file was saved. Once you select a .tsi file and click OK the next window will pop-up asking you which settings do you wish to import. Only "controller mappings" and "effect settings' categories will be selected - then click OK. Please note that you need to repeat this step one more time to successfully import the FX settings.
3). Once the mapping is installed there will be four different mapping devices in the menu. Make sure that In-Port and Out-Port are set to your MF3D for each part of the mapping and start jamming!
NOTE:
Let me know what do you think is wrong with this mapping if you decide to hit a thumb down. Please leave your feedback so I can hopefully make it better and give you support. Thanks.
Problem downloading or other issues? Let us know on the forum.
Comments for v0.1.2
Ed about 10 years ago
I downloaded this, and got quite excited because I have never been able to use Freeze mode before. I am using windows, Traktor 2.10, and a Pioneer DDJ-SX. The mapping works, but its really glitchy - lighting up the Pioneer and causing the music to stop. I installed the MF mapping first (using the large IMPORT button) and then re-installed the Pioneer mapping. Is there anything else I can try? Could it be that it is overloading the CPU? I have a Corei5, over 2Ghz, and 4G ram. So not super powerful. Don't usually have CPU issues with Traktor though.
Comments for v0.1.1
Comments for v0.1.0
Stewe over 11 years ago
Thanks for your feedback! I think that idea is good - I'll update download package with non-effect version as well.