MF Pro Launcher
Description and Instructions
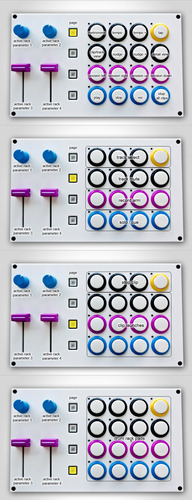
This is a Ableton Live MIDI sript made for the MF Pro to mimic some basic behavior of the Launchpad or APC. Like launching clips, arming, muting tracks, etc. The mapping consits of 4 pages. First make sure that you have enabled the 4 Banks mode in the MF Utility app. Page 1: is the General control page and consists of tempo controls, global play, stop and record and the controls to move around the "red box" Page 2: is the Track control page. Each row corresponds to one of the rows inside of the red box. And it consits of Track select, Mut, Arm and Solo. Page 3: is the Clip control page, you have a 4x3 grid and the top row is the stop button for each track. You can find more details and demonstrational video on my website
Page 4: is the drum rack pad. It plays the highlighted 4x4 grid in the drum rack. Make sure that the drum track is Armed and the Track input is On in the Midi preferences page. Also the knobs and faders get automatically mapped to the first device of the selected track, "blue hand" http://tomashg.com/?p=663 and http://forum.djtechtools.com/showthread.php?t=54533 PS: thanks to gonecrazy3000 for pointing out that the preset buttons on the Beat Masher are arranged differently so the pages would be like this: preset button 1 =>page 3 preset button 2 =>page 1 preset button 3 =>page 4 preset button 4 =>page 2----- SETUP ----- 1. Make sure that your MIDI Fighter Pro is set in 4 banks mode. 2. Extract the zip file inside Ableton's MIDI Remote Scripts folder. Located in C:\Program Files (x86)\Ableton\Live x.x\Resources\MIDI Remote Scripts\MIDI_Fight_Launcher under Windos or \Live x.x\Live.app\Contents\App-Resources\MIDI Remote Scripts for Mac OSX 3. Rename the extracted folder to 'MIDI_Fight_Launcher' 4. Launch Ableton Live and go to Preferences. Under MIDI Sync tap select MIDI Fight Launcher in the Control SUrface drop down list and set the correct input and output MIDI ports. Also make sure that the Track is set to On for the Drum Rack page to function properly.

absrdst over 12 years ago
chris raymond over 12 years ago
ghztomash over 12 years ago
As a matter of fact you don't really need an .mfs file for this to work
chris raymond over 12 years ago
Which file do I need to locate in order for it to work then? The MF utility doesnt see any openable files the way you demonstrated in your youtube tutorial. Sorry :P
Cody Hansen over 12 years ago
I'm having the same issue. Your video says to Import the "Launcher Settings" in the downloded files. However, there is no file option to select. Further, the file menu won't allow anything to be selected once inside the MIDI Fighter Launcher folder. I'm using a Mac - is it compatible? Thanks for the help!
chris raymond over 12 years ago
...bump
ghztomash over 12 years ago
This is an Anbleton Live surface control script, the only thing you have to do in the Midi Fighter utility is set your MF Pro to 4 banks mode. The video you mentioned describes the MF3D script, which has the color settings, just ignore the .mfs import and follow the next steps. Also there is a guide in the README file. 1. Make sure that your MIDI Fighter Pro is set in 4 banks mode. 2. Extract the zip file inside Ableton's MIDI Remote Scripts folder. Located in C:\Program Files (x86)\Ableton\Live x.x\Resources\MIDI Remote Scripts\MIDI_Fight_Launcher under Windos or \Live x.x\Live.app\Contents\App-Resources\MIDI Remote Scripts for Mac OSX 3. Rename the extracted folder to 'MIDI_Fight_Launcher' 4. Launch Ableton Live and go to Preferences. Under MIDI Sync tap select MIDI Fight Launcher in the Control SUrface drop down list and set the correct input and output MIDI ports. Also make sure that the Track is set to On for the Drum Rack page to function properly.
chris raymond over 12 years ago
Thanks a ton.
outofodrer about 13 years ago
ghztomash about 13 years ago
Hey, sorry for the late reply. You are absolutely right, on the beat masher the bank order as well as the knob order is mangled up. Unfortunately I don't have a version for the BM, but it should be no trouble editing the mapping file. Simply navigate to the Mapping folder, and open MIDI_map.py in a code (or text editor), scroll down to the bottom of the page where it says "PARAMCONTROL = " and a bunch of numbers, each of those numbers is the CC number for that specific param control. I'm not sure exactly which values the beat masher sends, but you can easily find that by manually mapping something in Ableton, note down the CC number, subtract 1, and write it in there. (or just swap them around) Unfortunately this is one of my first mappings, and its not so edit friendly, If you have any troubles let me know
outofodrer almost 13 years ago
Thanks for the reply. After a bit more research I ended up using a combination of midiyoke, midiox, and Bomes to translate the bm messages into the messages of a supported device. Now ableton thinks my bm is a Tranzport control surface. Which makes me wonder, is it possible to get the necessary cc/hex/channel data for a control surface that has the red box? Or even more generally, would emulating scripts be easier than customizing/writing scripts?
Michael Lindfors about 13 years ago
ghztomash about 13 years ago
Did you make sure that Track is activated in your MIDI settings in Ableton?

ghztomash over 12 years ago
You have to import the files in your Ableton Lives Python scripts folder. You can find all the steps in the README file